For any streamer, it is a fundamental task to have better streaming graphics. A stream overlay is a must-have to ensure attractive and eye-catching graphics. Basically, an overlay for the streamers refers to the transparent image overlaying on top of the game or the Livestream subject. It must be on a PNG file and located on the edge of the screen. However, many streamers customize the overlay to have a better audience number and also to make a brand identity. For that, they have to set a stream overlay. If you don’t know how to setup Stream Overlay, this content is just for you. Just keep concentrating here, and you will learn almost everything about setting up a stream overlay.
How to set up a Stream Overlay?
Making a stream overlay is essential for many different reasons. To boost your audience and to make a recognizable brand value, you need to create a perfect overlay for the stream. However, most often, an overlay is about brand-related observance. But you can also make it for yourself.
As a streamer, you must use Photoshop or other photo editing software. Well, you can simply use these tools to make your own overlay.
To make a complete overlay, you can follow the below steps that are easy and perceivable. And we have divided the Steps into 3 different parts. It will help you follow the steps easily.
Adding image overlay
Most of the overlays are made of images and texts. Some also contain animation of the logo. So, adding images is the first part we will discuss. And this part is easy, and you just need to follow a few steps for that.
Step 1
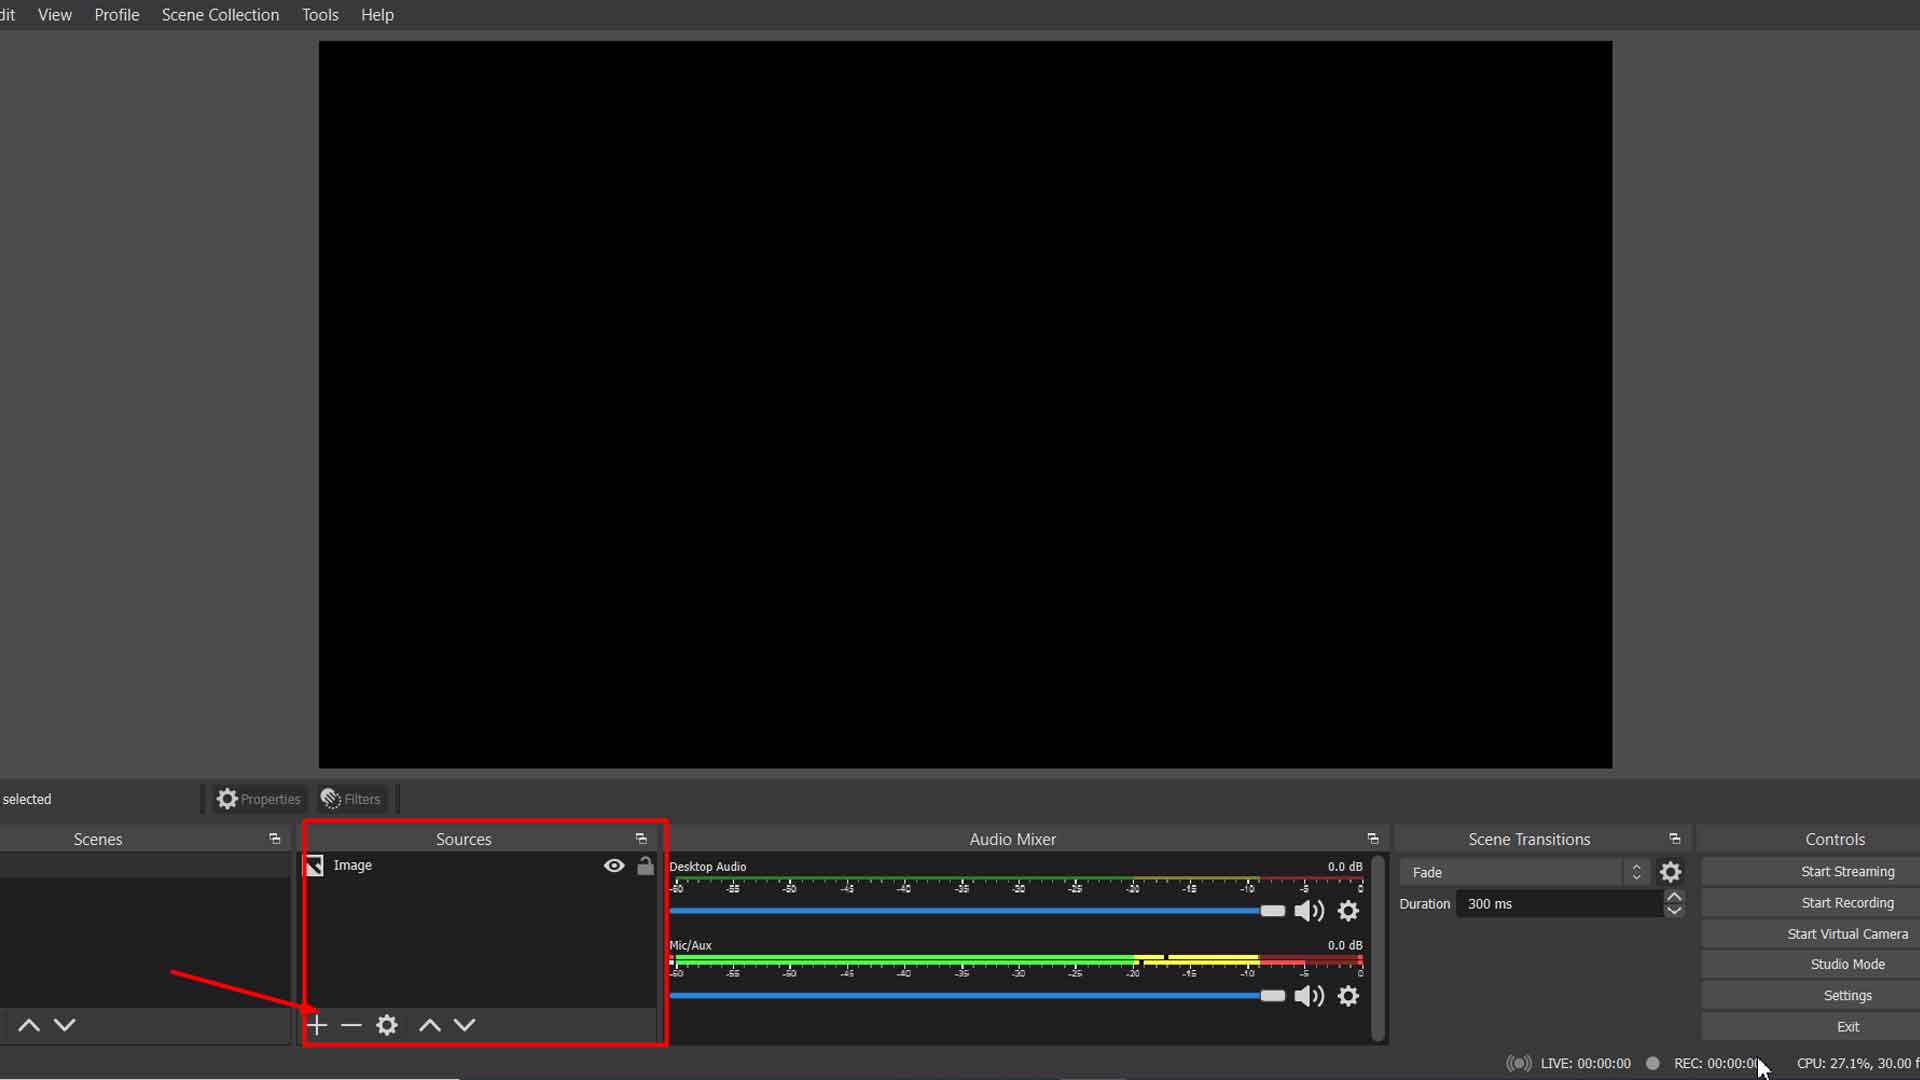
First, you need to lunch the OBS Studio on your PC. Now, scroll down to find the “Scenes” box. On the box, you will find a small “+” button.
Just check it in the bottom-left corner, and you will find it. And you need to click on it to create a new scene.
Now, add a title on the pop-up window, and to confirm the title, you have to click on the “OK” button.
Step 2
Right on the bottom part of the left side of the “Sources” box, you will find a “+” icon. When you click on it, a pop-up menu will appear.m instantly. Now, you have to select “Image” on the list of options that you have got on the window.
Step 3
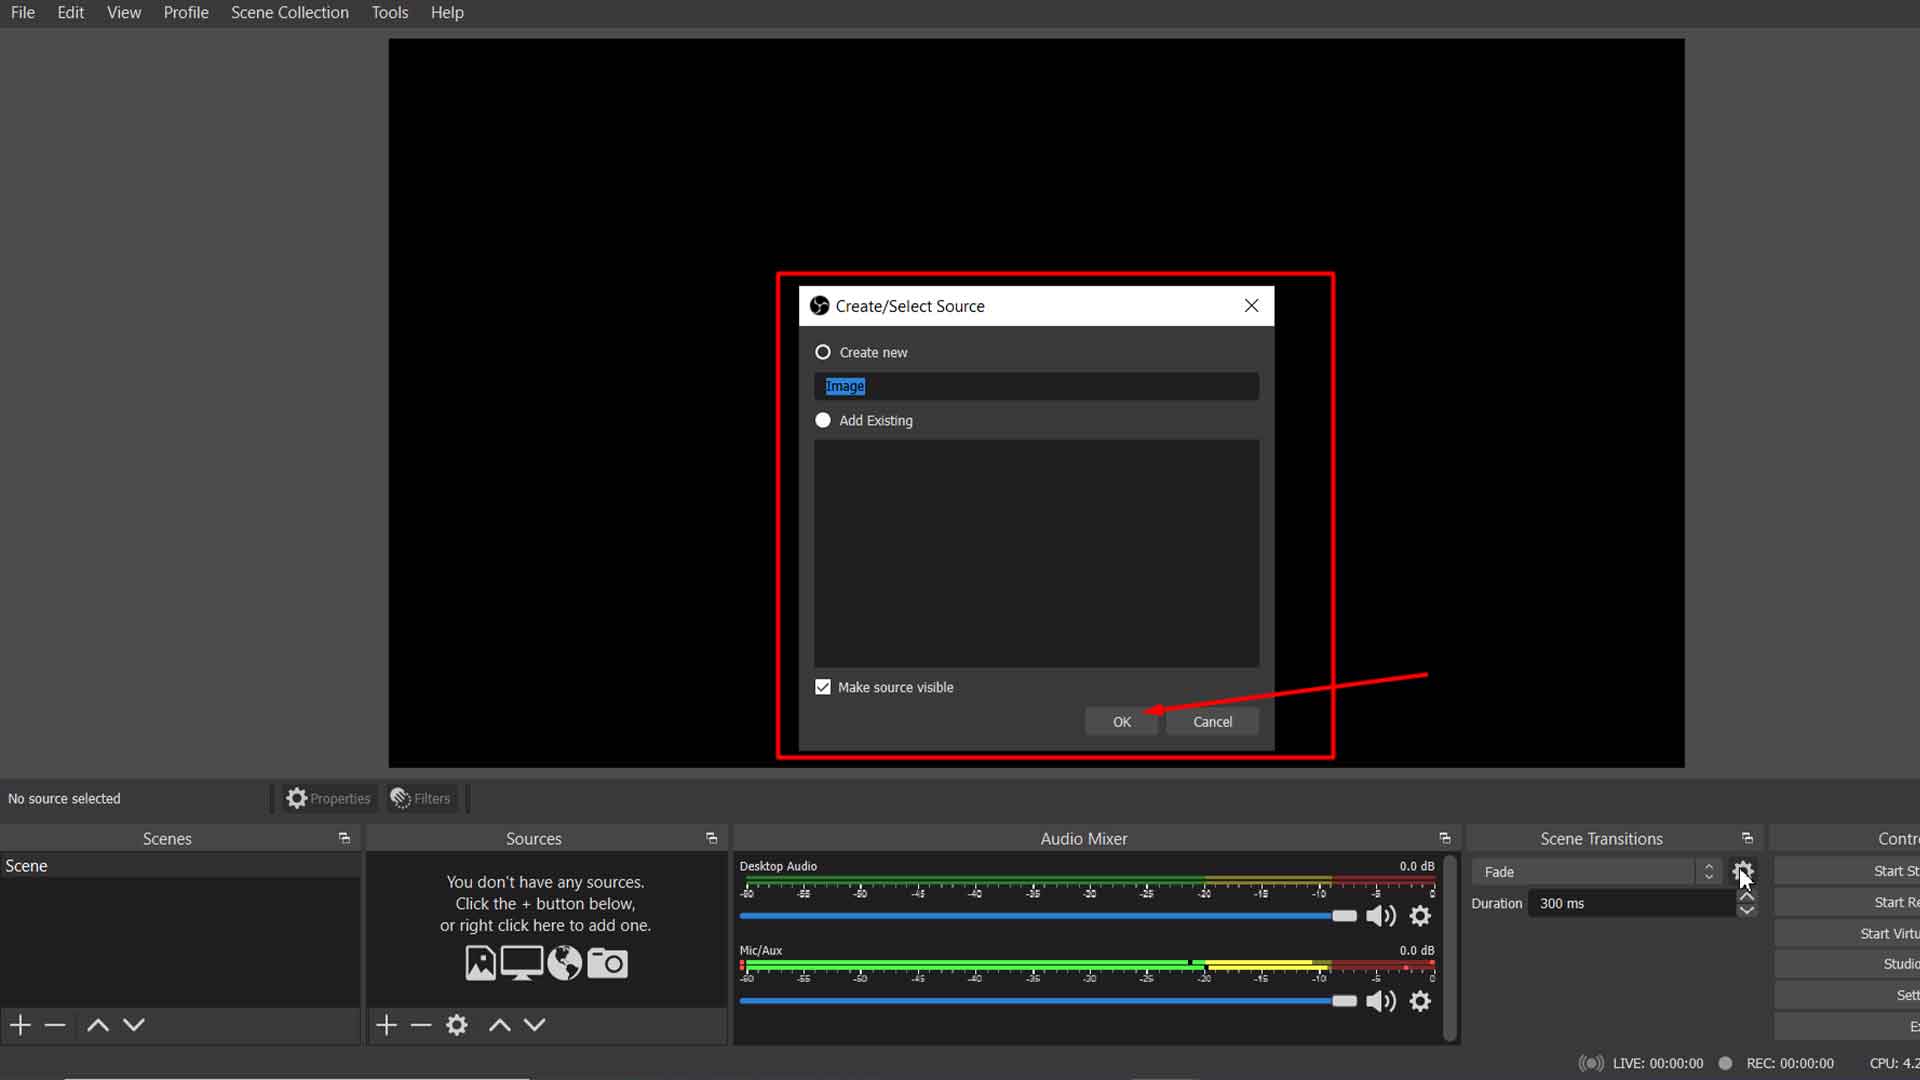
Once again, a new pop-up window will come as you click on the image option. Here, you have to enter the title of your stream overlay in the corresponding field. Next, you need to confirm it, and for that, you have to press the “OK” button.
Step 4
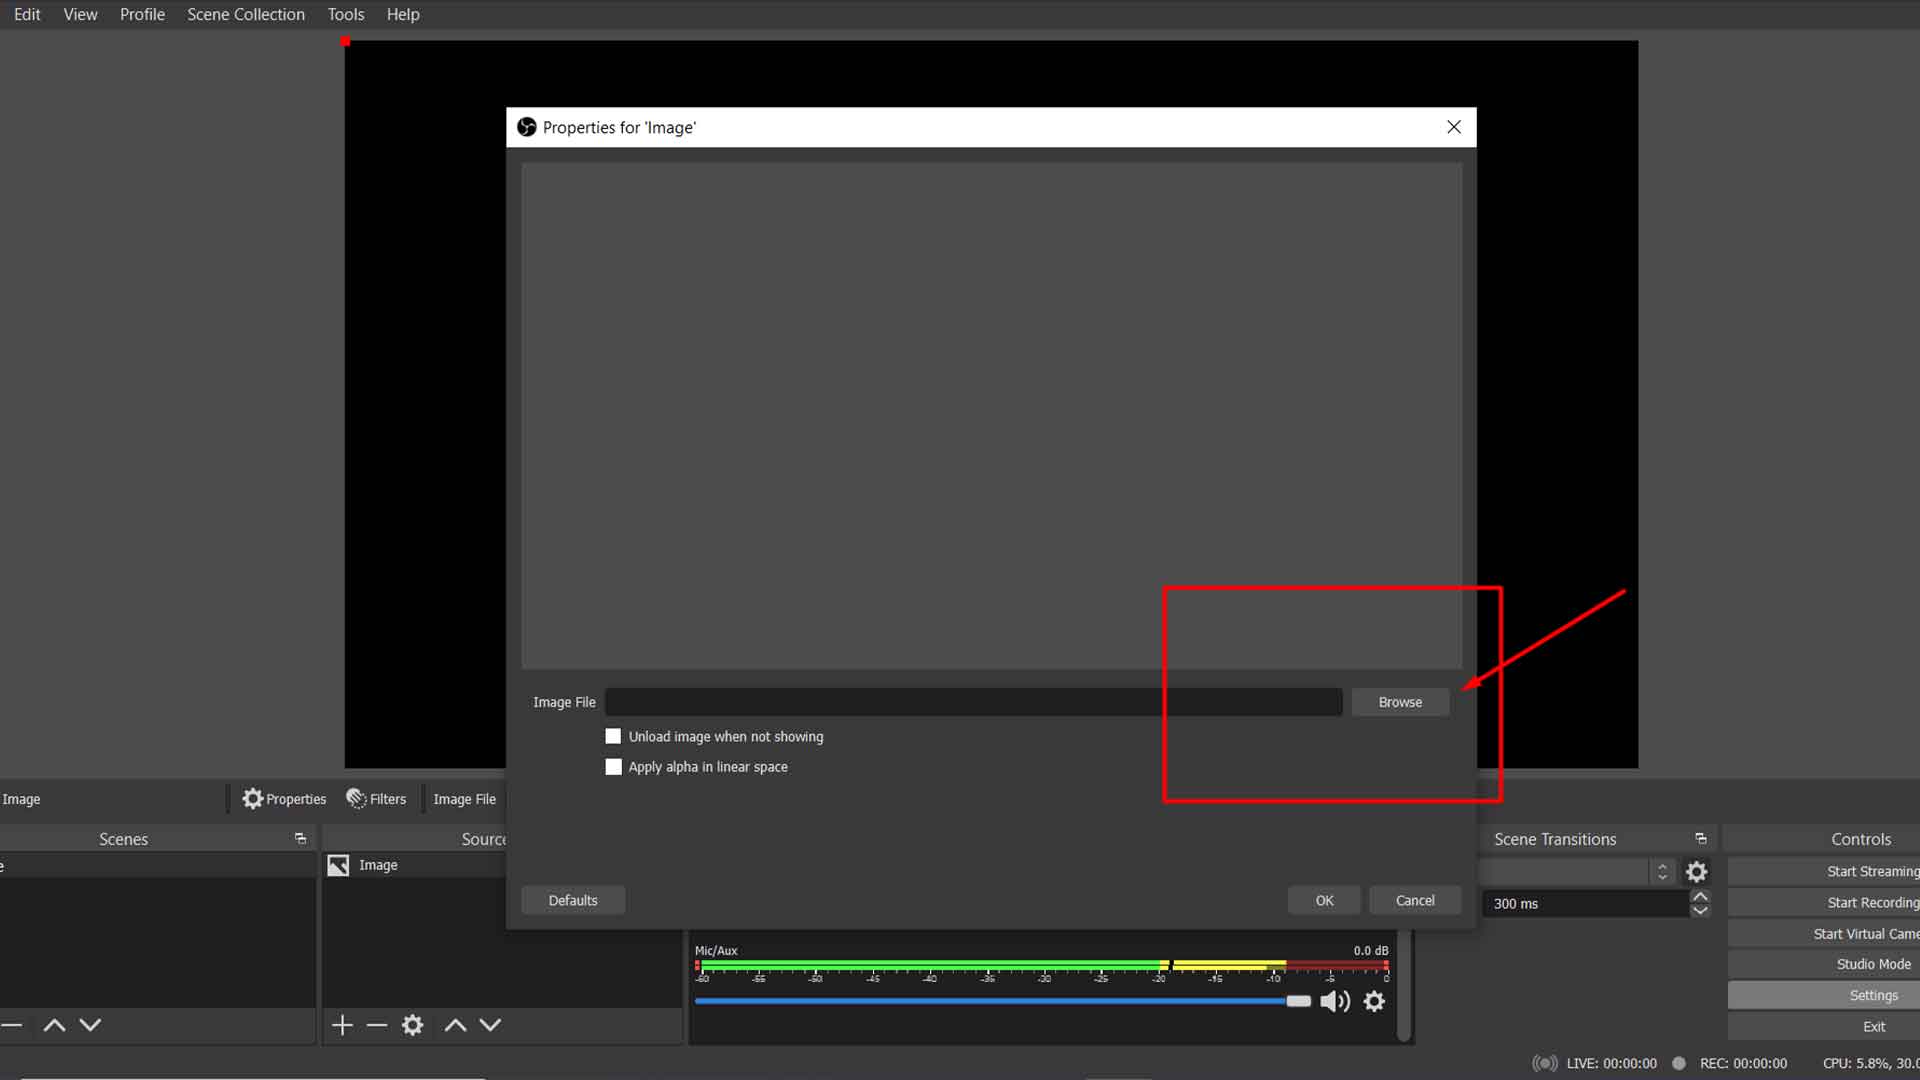
On the new window you have got right before, you need to find the “Browse” button. Click on it and check the right-hand side of the window thoroughly. You must find the pre-selected image. This part will help you to check the preview of the stream overlay from this window.
Step 5
Lastly, it’s time time to check if the image fits the canvas perfectly. If it’s not, you have to resize it with Alt Cropping. Make sure to resize it until you get it to fit on the canvas. And then everything is just completed successfully.
Adding text overlay
After you successfully add the image overlay on the stream, you need to add the text overlay on it. And this process is indeed very easy and quick. Eventually, you can add the text overlay in two different ways. But we prefer following the first way, and you’ll get it right below.
Step 1
First, you have to open the “Sources” box. Now, scroll down until you find a little “+” icon. You will initially get it on the bottom left side of the box. Now, click on it.
Step 2

Once you click on the “+” icon, you will find a pop-up menu there. Look at the menu and find the “Text.” icon. Here, you have to add a title to the overlay and then press the OK button.
Step 3

You will certainly find a new window as soon as you confirm the text by pressing the OK button. This window will let you write whatever you want on the overlay. However, on the window, find the text option again, and then you can write down the text there.
Step 4
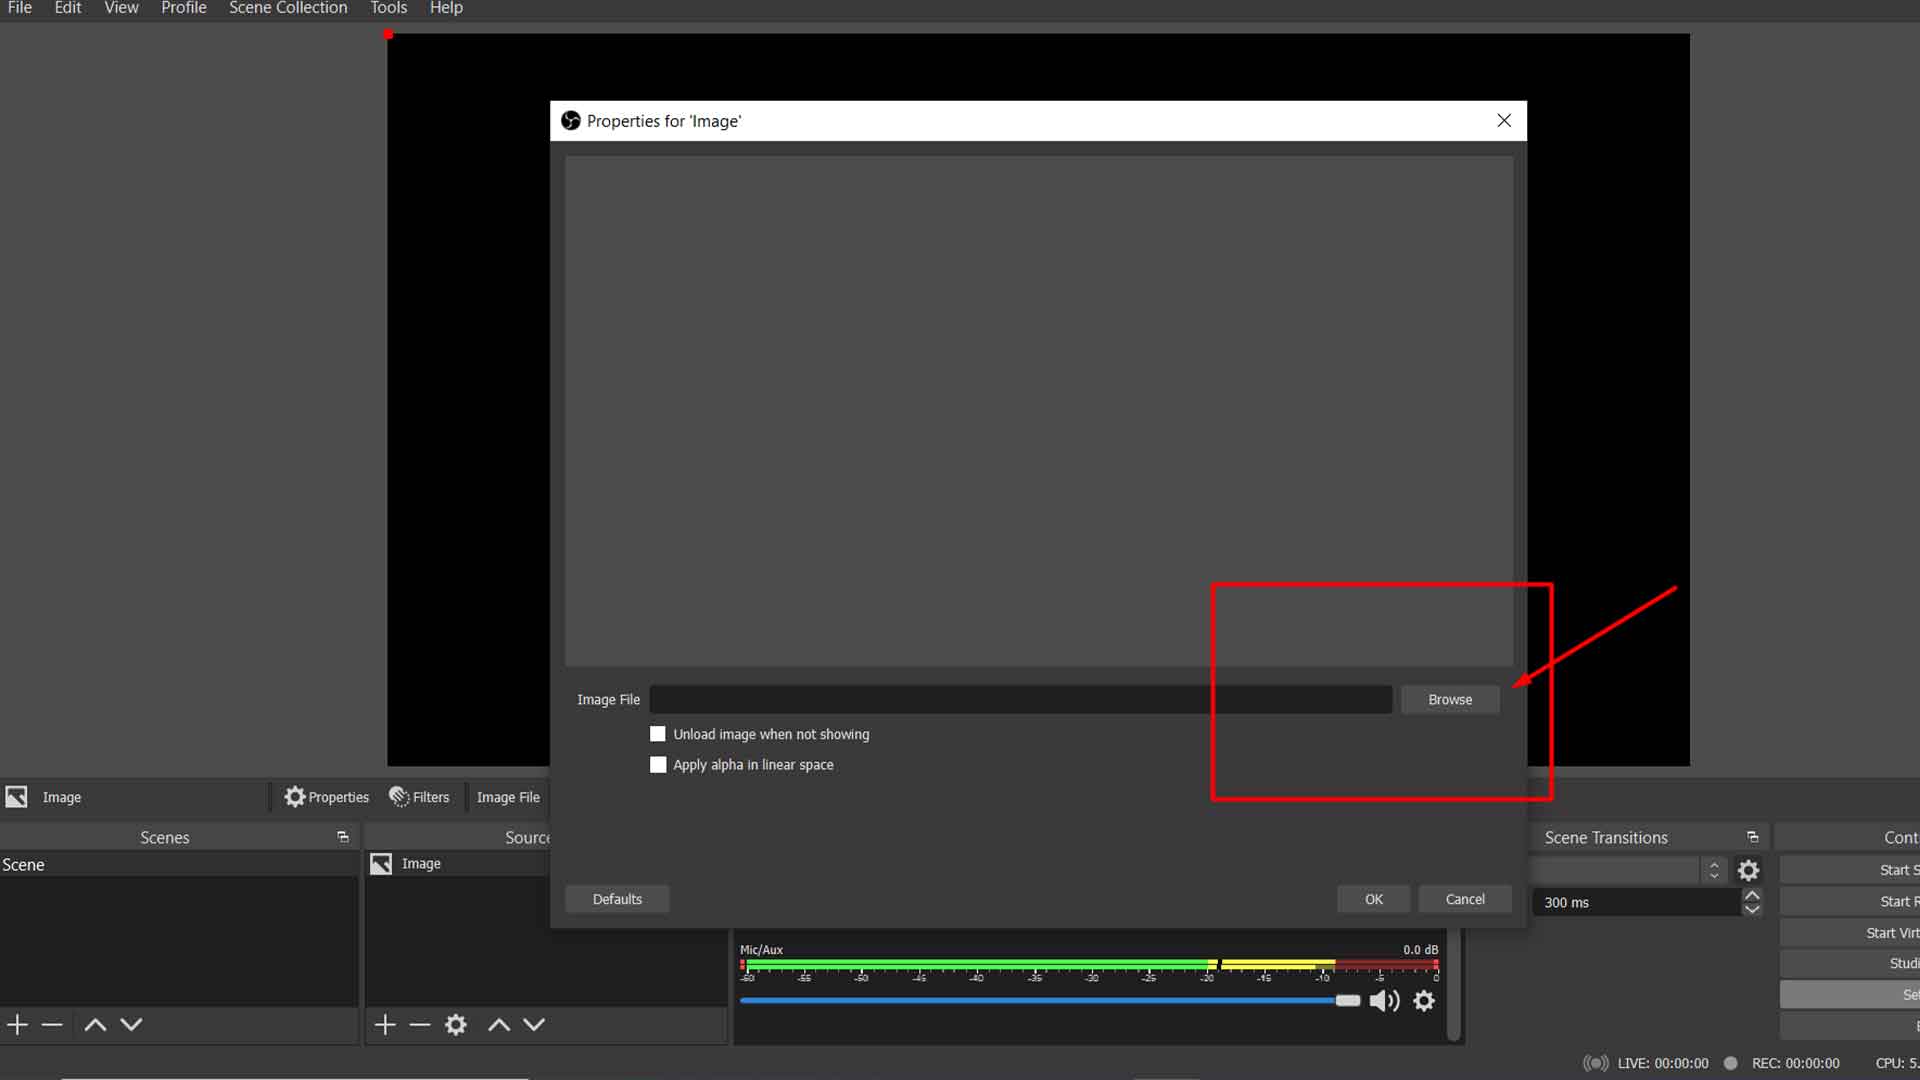
Check twice that the text doesn’t have wrong spelling and anything error. Once you confirm it, just click on the OK button again.
Well, this is the first method that we always prefer. It is easy to follow, and there is no risk factor. Still, if you want to learn about the second option to add text overlay, we can help.
Here, you will need to use a separate photo editing program for sure. You’ll need it to design a text file. So, make sure to keep your text ready in a file. Once you have the file ready, you have to save it as a png file and then add the file to OBS.
Adding logos on your stream
Lastly, you have to ass a logo or a video file as the overlay on OBS. You must need it if you want to zhuzh it up. A video file is essential if the logo is an animated one.
So, it would help if you learned how to add a video file to OBS. You can simply make it following the below instructions.
Step 1
First, you need to open the “Sources” box just like you did in the previous part. And again, you have to scroll down to find out the pop-up menu and then open it. There, you will get the “+” button, and again you need to click it.
Step 2

Here, you will find the “Media Source” function. Just select it, and there, you will get the list of a few options. You must get an option called source title.
Now, you have to enter the title in the small pop-up box that you got on the source box. Lastly, find and click the OK button to confirm it.
Step 3
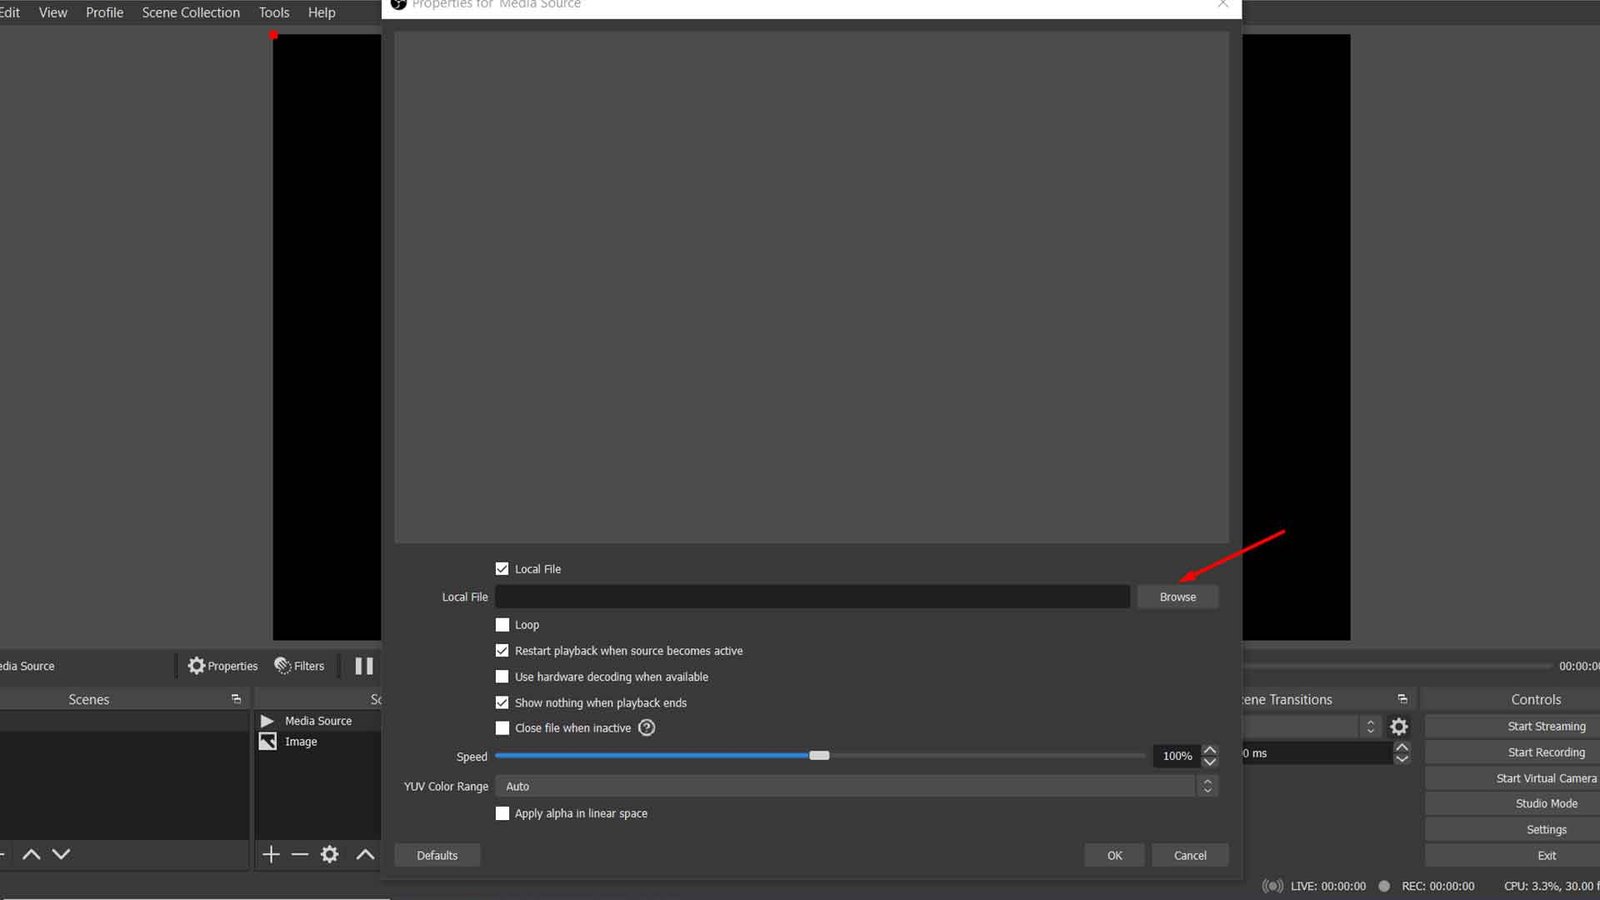
As soon as you confirm the source title, you will get a new window. You must find the “Browse” button on the window. For sure, you will get it on the right-hand side of the animated overlay on your PC.
Now, click on it. Next, select the browse option and then click on the button “Open.”
Step 4
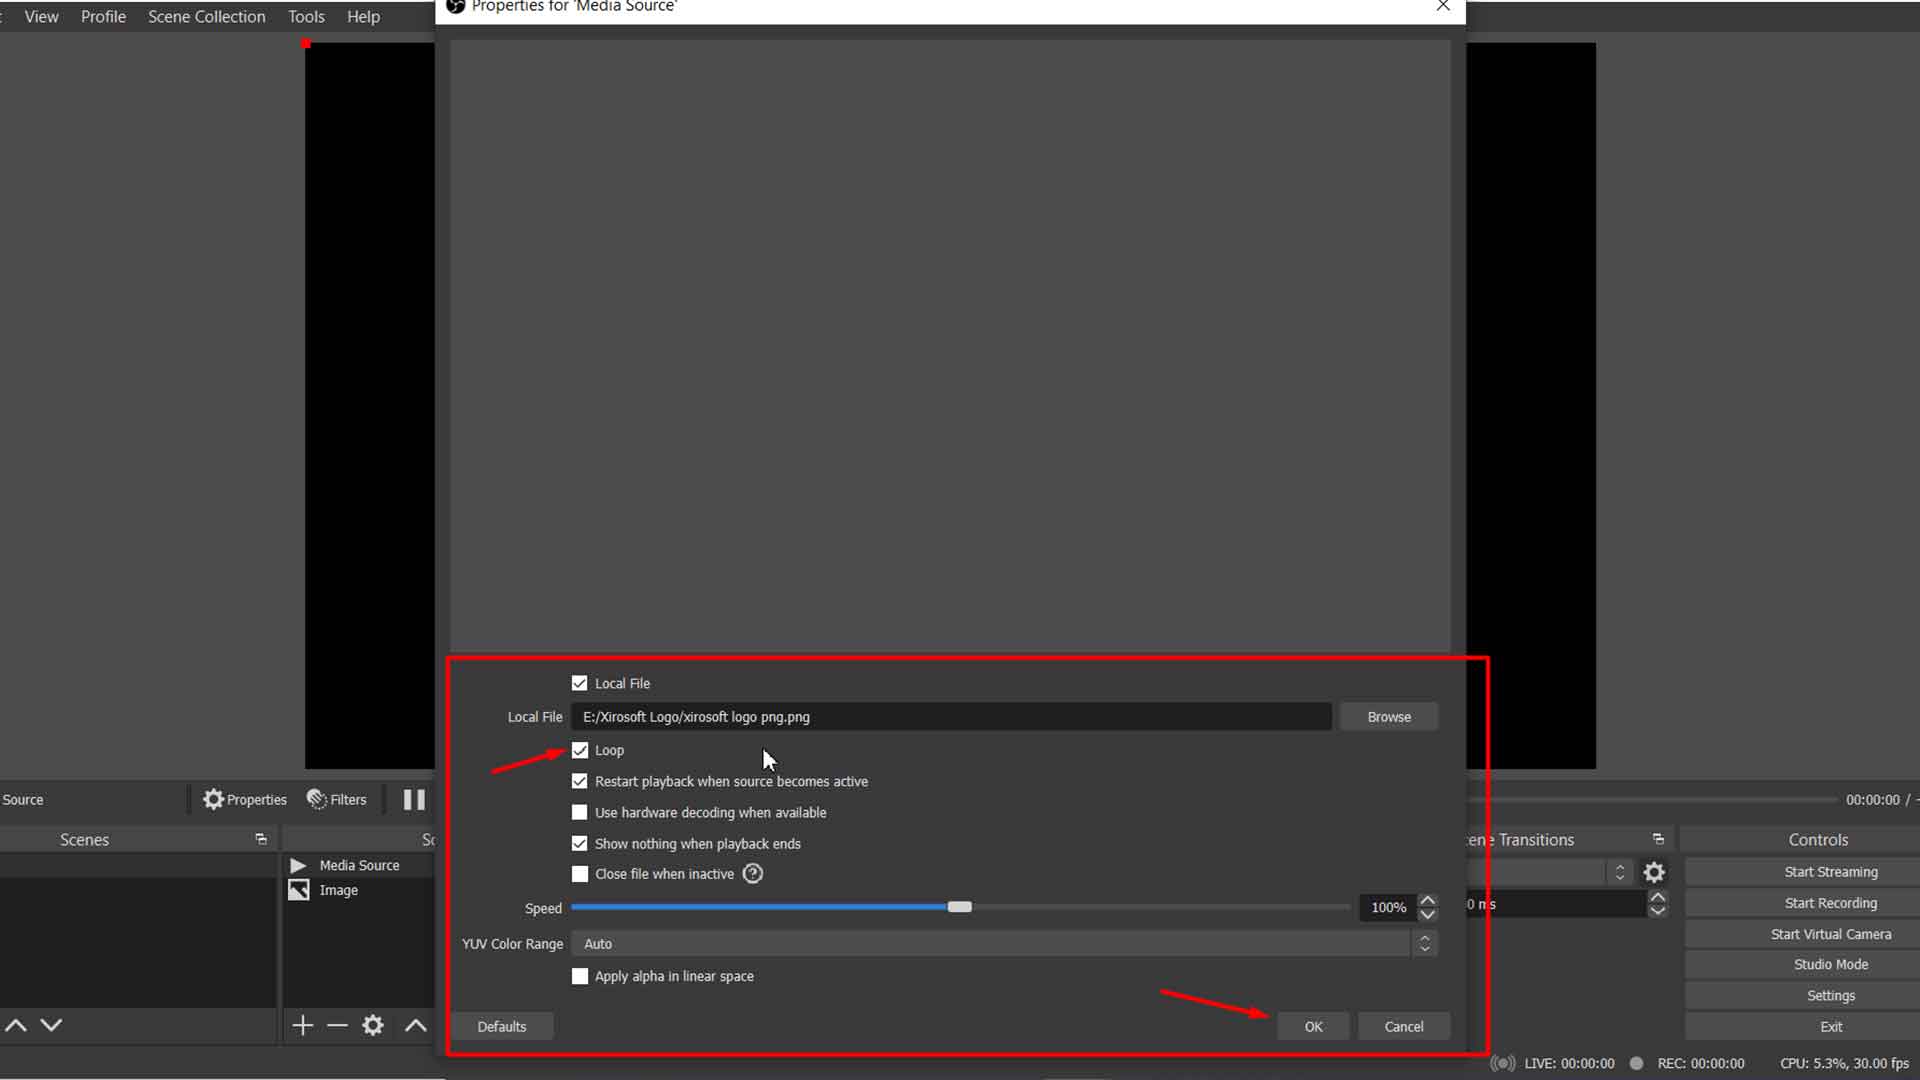
Check the window you have got on the previous step thoroughly. You must find a box next to “Loop.” under the window.
If you don’t check the box, you might lose the overlay when you complete the animation. However, make sure that it is in the right place.
Next, time right-clicks on the overlay you are about to add. And you will get a drop-down panel when you click the overlay.
On the drop-down panel, you will get a list of options. Among them, find one called “Transform”. Next, click on the “Fit to Screen” button.
All your tasks have been done completely. You can skip the third task if you don’t need to add an animated logo on the overlay.
But you have to follow the steps of other tasks sequentially to complete them successfully. Adding text is essential and so, it is better not to skip the second part. But the third part is optional.
Professional Tips to Make My Own Overlay
Yes, we have some professional-level tips forThe overlay designers that can help the entry-level design to make a pro-level overlay. So, let’s check out the tips shortly.
- On the overlay, you should use only relatable and legible graphics. The graphics must say what’s on the topic of the streaming.
- You shouldn’t use too much overlay on the stream. Otherwise, it will steal the stoplight instantly.
- A cohesive theme can be appealing and ideal for the stream. So, you must be careful enough to select the theme.
- The overlay should only impact the important aspects of the content. For that, you need to create a focal point on it.
- You should also add relevant information on the overlay. Simply, you can add links, social media, or other info to grab the attention of the viewers.
- Add a logo on the overlay. It will emphasize your branding and will increase the authenticity of your content.
So, make sure to follow the mentioned idea while making your own overlay. It will help you to be successful in your purpose of the stream. Additionally, you will get more audience and be able to build an authentic brand of yourself.
FAQs
Q: Why should I create a stream overlay?
A: Create a stream overlay is very important for the streamers. It will help you use lots of customizing tools to design your overlay. You can add text, images, and video files that to grab the audience’s attention. Additionally, it helps to get an authentic brand value as well.
Q: Is there any free online tool to make a custom overlay?
A: Yes, there are lots of free online tools to make custom overlay. Altho ugh they have some limitations compared with the manual methods.
Placeit can be an option among them for sure. Basically, this free template design generator provides a very easy to handle system to make a simple custom overlay. Besides this, you can also try Canva and Stream Maker.
Q: Is it good to take a custom twitch overlay service or use any online tool?
A: Yes, it is good to take a custom twitch overlay service instead of using an online tool. The custom overlay service will help you boost your streaming with lots of benefits. Eventually, some of the online tools don’t provide service for free and often they break down.
Q: How can I add a layer of fun to my overlay?
A: On a single stream session, you can simply add multiple overlays and layers of fun to make it attractive. You can use a lot of options for graphics to add layers. OBS Studio is the best option among them.
It will simply let you add images, text, and also video files of your animation logo on the overlay. If you have other layers of fun to add, you can simply use OBS Studio for that as well.
To Wrap Up
So, from now on, streaming will be fun and exciting. Your custom overlays will help you get a brand identity in the world of streaming. Hopefully, you have understood all the steps and simple tips to make your own overlay.
Still, if you need to learn something more, you can simply knock us for that. We’ll come to share our years-long experience with you. Thank you for your support.

